Thursday, December 8, 2011

Lavender Heat Bag


Good morning or afternoon or evening. Not sure when and where you are so I covered all my bases. I would like to share with you how I make my Dad, his annual heatbag. 


I started this time with a towel.

I usually use corduroy but I am out. You have to use 100 percent cotton fabric and thread, as polyester thread and fabric wont hold up to the heat over time.

I figure out what size I am going to make him and fold the fabric in half and cut. This bag is 16" x 12" so I cut my fabric 17" x 26". You can make whatever size you want! Sew up the sides and press the top over for a finished hem.
Turn right side out and sew tubes from the bottom to top. Fill these with rice and lavender. I add about 1/2 cup of lavender to 3 cups rice.  It probably took around 9 cups of rice and 1 1/2 cups lavender. 

Fill each tube about 2/3 full. Sew the top closed.   I double sew this so no rice can escape from its little cell.


I like to make covers for the bags as they can be taken off and thrown in the wash. I make them the same way, except I don't sew the tubes.

I add a piece of Velcro to the top and that's his annual heatbag.


Microwave for about 2 to 3 minutes at the most. The rice will burn the bag if left for too long in the microwave. You can use these as cold packs too. Just pop into the freezer and leave them in there all the time, until you need it. It will stay cold for quite awhile.   *Note*  The lavender scent will eventually fade.
 Stay Warm!
Oonga
Sisterkins

Party With Me At
monogram

Storage for Wine

Welcome.  It's been a while since I have blogged but I am back and  I bring wine!  My other half and I are into the art of wine making.  It's a wonderful hobby and a win win for all.  We get the excitement of creation, and rewards of  drink.  It's great to have a bottle of wine to just drink,  to enjoy with company,  to take as a hostess gift or crack open after a crappy day....or just to drink.  And did I mention just to drink?  Anyways, my other half scored these awesome shelving units from his previous employer.  They were going to take them to the dump....I  am sure they meant my basement.  We are renovating our basement  and was able to plan for the ultimate wine racks in our new cold storage room.

  We fit them in and went to work painting the fronts with chalkboard paint and lined each bin with shelf paper.  We can keep track of what's in the bins, and when finished, just erase.  It works great for us, and looks great too.

Well I am off to get a wine glass.
Bye for now.
Eeesh
Sisterkins

Tuesday, December 6, 2011

Pine Cone Trees


Here's another take on the use of non Styrofoam forms.

  Click HERE for my first. 
I gathered pine cones, almost a garbage bag full for these trees.  Actually I made four but I gave two away.  I had some inserts from a box that I purchased at a thrift store.  They were thin plywood pieces, about 3/8 " thick,  and they had slots cut in them.  They fit together kinda like those shoe storage systems that my daughter needs.  Actually she would need a huge walk in closet for her shoe dilemma but that would be another blog.   As we used the box for a base for a worktable in the shop, the inserts were garbage.  I decided to make 3-D trees.  I cut two tree shapes and measured the slots so they would slide into one another and meet in the middle. The total height of the forms is 30 inches.  You can make them any size.

This would be easily done with some thin MDF and a table saw, jig saw or whatever you have on hand to cut with.  I just have issues with throwing out usable pieces of wood.....(kinda, a little, sort of a hoarder)...  I slid them together to form a 3-D tree.


Next step is to start gluing pine cones on.  Start with big ones all over and fill in any bare spots with smaller ones until no wood is visible.  It takes awhile to do this but they are so pretty when all done.
  It also takes a lot of glue and a whole whack of pine cones.  (Ouch to my fingers too).  After the pine cones were placed and glued, I sprayed some cinnamon fragrance oil directly on the cones, and I must say they are wonderful.  You can add holly and other embellishments to them.  I did that with the ones I gave away.  They were very pretty but unfortunately I didn't take pictures.


  They scent up the whole entrance with Christmas smells, and 
guests think they are in for a real treat when they step in the house :) until I 
break the bad news and tell them
"I wasn't baking.  Sorry, all I have are store bought biscuits."  :(  
That's it.....just another way to make none Styrofoam forms and a little way to disappoint your guests.
Have a Creative Day!
Oonga
Sisterkins

Sunday, December 4, 2011

The Rowdy Boys


Hope you all had a great weekend.  My next post is a copycat from I don't know where.  I saw it last Christmas on the computer somewhere.  I think it was on Tipnuts.
I decided to make these for some young visitors that were coming this weekend.

    The Drunkin Rowdy Party Boys
  
Gather your goods and away we go.
As it turns out, I didn't have any fruit roll up so I had to use gummy worms.


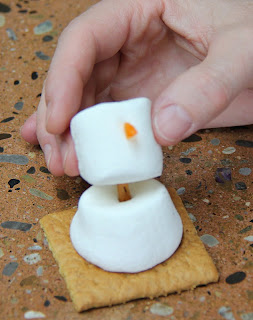
I placed a marshmallow on the graham wafer and microwaved for 7 seconds.  This was through trial and error that I figured this out.  Every microwave is different so you might have to do a bit of experimenting yourself.  They "blow up real good".  Lotsa fun!!!!


With the second marshmallow, grab a pretzel and poke it in the center.  Place it on the melted marshmallow.  I cut a wee slice of the gummy worm for the nose.

  With a few melted chocolate chips and a toothpick, paint on some eyes and a mouth.  I really would of preferred to pipe on the chocolate, but my baggie broke and I had to work quickly, so I just used a toothpick.  You could also buy those little icings in tubes for this job.  I think it would do a neater job, although little mouths didn't seem to mind. 

I separated the Oreo into 2 and glued a Rolo on top with some chocolate.  This makes a hat.  Glue it on the marshmallow with some melted chocolate.  Stick in two pretzels for arms, but make sure Mr. Snowman doesn't get fingers or he will eat his hat.  True story.....
The one in the background started to eat his hat so I had to take his fingers off


I had to cut the gummy worm in half as it was just too thick for a scarf.  Chocolate up some buttons for him too.


They look a little drunk and rowdy, but they were the hit of the party.
Cheers!
Oonga
Sisterkins


Party With Me At monogram