Tuesday, November 8, 2011

Making A Tulip Tree From Leaf Catchers

Remember those leaf catchers we found
for a bargain?  I decided to refurbish an old lamp
that has been using up space in my house.

The lamp never seemed to work so I took it
apart, and ended up not using the top rod.


I purchased tissue paper from the dollar store
and modge podge the tissue onto the leaf catchers.
I actually ran out of modge podge and used white glue, don't do that
the modge podge worked better!


From there i strung them onto a mini light strand.
Took green duct tape, yes duct tape it is not only for men
but we like it too!!! Formed leaves to attach the strands
onto the light set.


Attached the lights onto the pole, yes with
more black duct tape
and presto!  A lamp for my daughters
room.  Kind of funky.

Hope you Have a Great Day
Bessy Boo
Sisterkins
Linking Up With
http://www.thethriftyhome.comSomewhat Simple
A Crafty Soiree

Monday, November 7, 2011

Chai From Scratch

Well today I am going to share my very secret chai recipe.  Please don't tell anyone.........TELL EVERYONE!! But please link back to me if you are going to share and let me know what you thought of my recipe.  
I started experimenting many years back as I found the cost of chai a little STEEP  LOL LOL  GET IT STEEP. (OK a little lame)......anyways,  here is my recipe:

Homemade Chai
1 box of loose black tea Ceylon or Orange Pekoe (about 4 or 5 cups)
6 to 8 cinnamon sticks
1 TBSP  whole cloves
2 TBSP whole black peppercorns
3 whole cardamon pods
1/4 cup star anise
12 whole dried orange slices
1 TBSP ginger powder
First step is to grind each of the spices individually (not the tea).   I have a glass jar on my blender as the spices will scratch a plastic jar blender.  I have also used a cheap coffee grinder for grinding my spices.   I usually start with the cinnamon.  I grind it down to, not as fine as cinnamon powder.


 Of course much of it turns to powder but there are still some small chunkys in there. Put in a large mixing bowl. 
Do each spice the same way and individually.


 Once you have all your spices in the mixing bowl, add the loose tea.  Blend with your hands until it is well mixed.  This is your dry tea blend.


To make a pot of chai, I usually use 1 TBSP per cup of water.
My recipe is for 4 mugs:
In a saucepan, put 4 cups of water with 4 TBSP of chai mix.


  Bring to a boil and let it gently boil for 5 minutes.  Turn heat down and simmer for 15 to 20 minutes.

  Strain the liquid chai.


 In a large mug, mix half the liquid chai with half milk and sweeten to taste.


 You can also use a heaping TBSP of sweetened condensed milk and liquid chai mixed with milk.  Experiment and see what is the best mix for you.  Hope you enjoy this chai as much as I have.

Have a Great Day
Oonga
Sisterkins

Linking Up With
http://www.thethriftyhome.comSomewhat Simple
A Crafty Soiree

Friday, November 4, 2011

Christmas Ideas With Homemade Chai

Join me Monday for my secret Chai Recipe

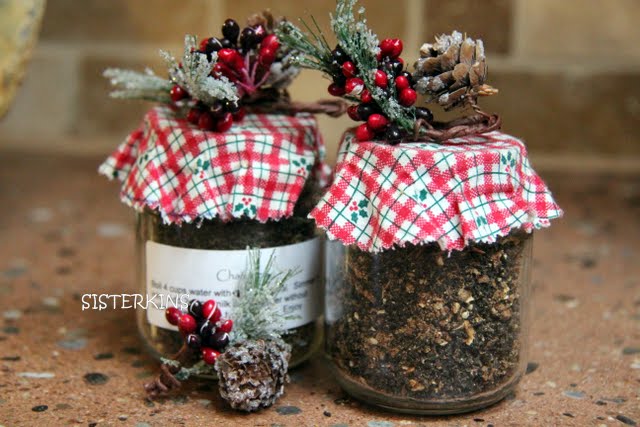
This is an awesome gift for family, friends, teachers, or anyone that needs a Christmas gift.
 I put dry mix in a babyfood jar.   Next step is to glue some Christmas fabric on the lid. 
You can embellish it with anything you have.
 Print the directions on an address label and adhere to the jar.


The dollar store is an awesome place to find mugs, snacks and Christmas trinkets.  Baskets can also be found at the dollar store, or you can head to the second hand stores and load up on beautiful baskets and whatever other deals you find, cause it's always worth a look.

Fill  your basket with chai, mugs and treats.  I usually line my basket with a Christmas tea towel.    You can wrap the basket in cellophane and ribbon.  This is a wonderful gift and much more economical than buying premade gift baskets, which contain lots of fluff but no heart.


Have a Great Day!
Oonga
Sisterkins

Linked Up With

monogram

Thursday, November 3, 2011

My Key Rack

Keys KEYS.....where are my keys????? Sound familiar?  It sure is a common sound here.  Mostly me.  Hopefully I have come up with a solution......well if I put my keys on it when I come home.....that's the solution.  Anyways, I actually saw this on a great blog:
 and instantly fell in love with it.  I knew if I had one, that I would never yell "Keys" again.  They would always be there because something so beautiful would put my keys in a trance, and they would be drawn to the hook.  Yes!  That sounds right.  So I went to my scrap wood again, and found some OSB.   Man I am going to run out of scraps with  all these scrap blogs..  I snuck outside cuz hubby was sick and I felt bad for leaving him in the house alone...... and started to cut up some wood.


 I fired up the sander and sanded and sanded and sanded.  I got my trusty glue and clamps and went to work.  


Back into the house and hubby didn't even know I was gone.  Sleep is a powerful thing.  I laid out my plastic and painted it pretty with some homemade chalk paint  CLICK HERE for the tutorial... I think I put on 3 coats.  This picture shows the first coat.


  I let it dry for about 1 hour and then quietly tiptoed out to the shop again.
  I sanded the edges......OH busted....Hubby came out to see what I was up to.....Poor guy.


  Back into the house for us.  I used my antique medium that I don't really care for and some carnauba wax.  I didn`t really mind it this time, but I think I will still get some burnt umber oil paint for next time.  Next step was to gather up my key supplies.  I have been thinking about this for about  months, so I was on the hunt.   I found my first prey at Michael's;  the keys.  They only had three left so I bought them all.  They were $1.50 each.  I attached them with epoxy.


 I printed some numbers from my word program on the computer and cut them out.

  I glued them onto the back of some tags I found at the dollar store. I used four packages " $1.00 each.

  The cup hooks were purchased at Home Depot and cost $3.60 for all.   I had to paint them cuz the brass was too shiny.  


 That was my total cost.  $12.10  The wood was scrap and the wax and paint were from other projects.   I assembled everything


 and this is what I ended up with.  I am pretty happy with it, although it was very different from my inspiration key rack .   I found a stud in the porch....no  haha... a wooden stud and measured and screwed  my new key holder to the wall.    Lets see if it works and puts my keys into a deep trance.

 I am going to attach 2 more keys to the top....when I find them.....AAAHHHH ALWAYS LOOKING FOR MY KEYS.
Have an awesome day!
Oonga
 Sisterkins

Wednesday, November 2, 2011

Straight (Round and about as possible and in many words) to the Point

Hi all,
My second blog post is a little more exciting for me than for anyone else, but I am too excited not to share it with you.
So yesterday I took the day off and Oonga was going to come into the big city for Halloween trickery, scary movie watching, and to visit me!
As it turned out, we like shopping too much to stay at home. We made our way to the local Value Village and begun the hunt for the find of the day.
The background story: For my Birthday back in September, Oonga gave me cash to get a new beauty tool. I have been searching for the perfect one ever since. We as sisterkins have a long standing obsession with making our curls and kinks go bye-bye.(I remember being one with my iron, yes IRON.)
Let me put this in a little more perspective for you.
One of these puppies brand new runs around 200 buckeroos. I got mine for the low low price of $7.99.
New to me!
Ta Dum!

Have a good day!
Eeesh
Sisterkins